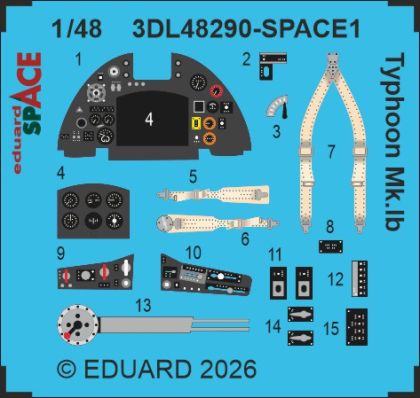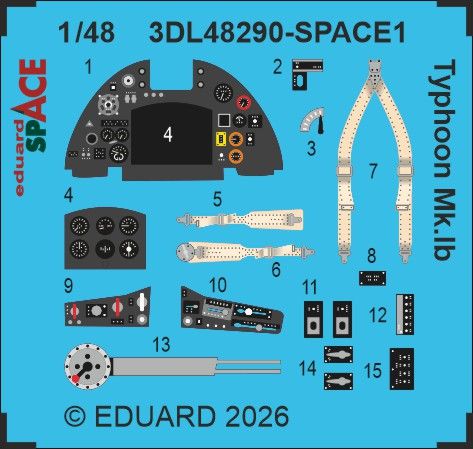
Eduard SPACE 1:48: the Hawker Typhoon Mk.Ib is a detail set for the Hasegawa and Hobby 2000 kits: 3D printed color instrument panels on a decal carrier and pre-painted steel photo-etch with seat belts. It is not a kit but an accessory for the cockpit.
Responsibility details are not available.
This is not an airplane kit but a detail set from Eduard that is bought in addition to a plastic model you have already purchased. The SPACE line means this: the main and side instrument and control panels printed by 3D technology straight onto a decal carrier, with a raised relief of the frames, the dials and the levers and in color from the factory, plus a small pre-painted steel photo-etched fret with seat belts and details that 3D printing cannot manage. Nothing has to be painted.
The set is declared for two kit manufacturers at once, and there is a logic to it: Hobby 2000 is a Polish brand that releases models from the molds of established manufacturers, typically precisely from the firm Hasegawa, and supplements them with new decals and masks. The plastic in the box is therefore the same; what changes is the packaging and the extras. That is why one set fits both versions.
The Hawker Typhoon Mk.Ib was a British fighter-bomber with the mighty Napier Sabre engine. As a high-altitude fighter it disappointed, but down on the deck it found its true calling: with unguided rockets and bombs it became the terror of German ground equipment, and after the landings in Normandy it was one of the main instruments of the Allied air strike against columns and armored vehicles. Its recognition mark is the thick chin radiator beneath the nose, and the Mk.Ib version was further defined by its armament of four 20 mm cannons.
Leave the 3D panels in lukewarm water for a second or two, take them off the carrier and settle them in place with tweezers. They do not stick by themselves: they are held by a drop of cyanoacrylate or dispersion glue. They have their volume printed right into them: the part is laid down, settled and pressed gently, but do not try to bend it by force. Separate the photo-etched parts with photo-etch scissors or the tip of a scalpel against a firm surface; snapping them out with your fingers is the quickest way to a twisted part. Make the bends on a photo-etch bending tool or over the edge of a steel ruler; steel photo-etch is stiff, your fingers will only slip on it, and on too sharp a fold the factory paint can crack, so shape the belts in smooth curves. Glue them with cyanoacrylate glue; cement for polystyrene will not join metal. If you are going to paint or varnish any metal part afterwards, degrease it; paint does not hold on a greasy surface and will peel off.
An accessory detail set, not a kit. The plastic model, glue and paints are not included in the package.
Naši poradci a znalci sortimentu jsou připraveni odpovídat na Vaše dotazy (Po–Pá, 8–18 hod).
Zeptejte se na co potřebujete, odpovíme co nejdříve.
Texts from customers in the advice section reflect solely the opinions and views of the customers. MNF trade s.r.o. does not approve or verify customer texts in advance.
There are no questions here yet. Be the first to ask!